Hey all! Its been a while since I last posted in here
So, returning with the usual posts (or rather unusual), I gonna show you how you can draw an image in Excel in some sort of pixel art style.
Introduction
Pixel art is a form of digital art, created mostly through the use of software, where images are shown and edited on the pixel level.
The aesthetic for this kind of graphics comes from 8-bit and 16-bit computers and old video game consoles, limitating the color palette in smaller sizes.
Getting started
First, be sure that you have Pillow and Xlsxwriter (v. 1.3.9 or superior) installed in your computer. If not, you can easilly install them using pip:
pip install Pillow
pip install xlswriter
Also, we will need an image to work with, so get any image you want!
Measuring our canvas
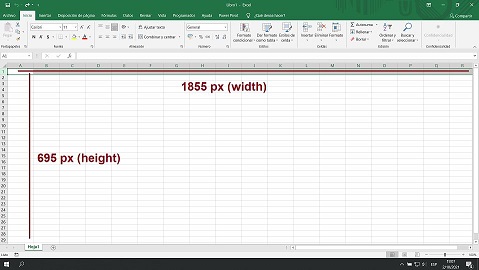
Since we are drawing our image in an Excel worksheet (our canvas), we will need to measure the size of it to make the correct calculations to show the final of our image.
In my case, my screen resolution is 1080 x 1920 pixels, and the workable area of an Excel worksheet is 695 x 1855 pixels, so I’m gonna use those dimesions for the calculations of my drawings.
Also, the minimun size of a cell in Excel can only be 1 x 1 pixels, so that is gonna be our limit.
Reading our image and making it into pixel art
The fist step is to read our image and do three kind of transformations wiht Pillow. I will be working with this image:
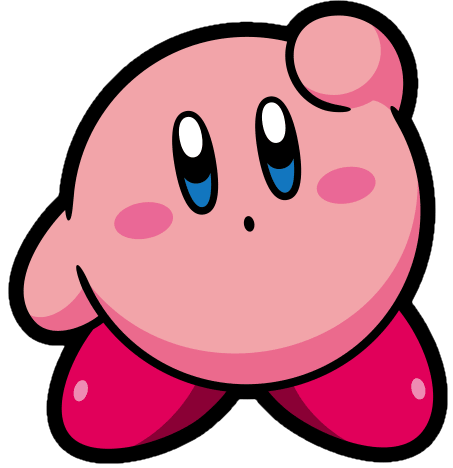
The first one is using the quantize method, reducing the number of colors of our image to get a better pixel like style. The second one is using the convert method, getting an RGB image the would be used lately. And the third one is using the resize method, changing the size of our image to fill the size of our canvas and merging some pixels in the process.
from PIL import Image

#Read image
img=Image.open('kirby.png')

#Reduce the colors of the image (here I'm using 8 colors)
pixel_image = img.quantize(6)

#Transform the image into RGB
rgb_im = pixel_image.convert('RGB')

#Resize the image to merge some pixels using the BILINEAR parameter (here I'm using 64x64 pixels)
small_img=rgb_im.resize((64,64),Image.BILINEAR)

#Resize again to a bigger size
final_image=small_img.resize((500,500),Image.NEAREST)
final_image.save('kirby_pixel.png')
Getting an image like this one:

Drawing our image into an Excel sheet
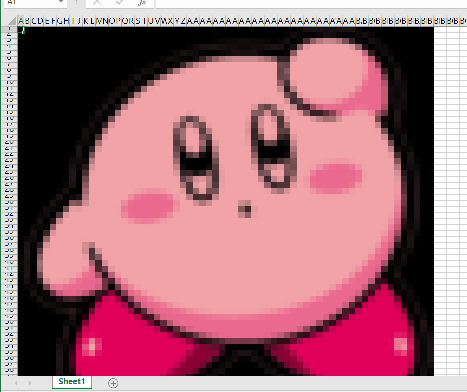
Now that we know how to get an image into a new one with pixel art style, lets draw it into an Excel worksheet.
In order to do this, we will use our RGB image and with the help of Xlswriter we will create a new .xls file and paint some of it cells to draw our final image. For a more comprehensive explanation of how to use that library you can go to: https://xlsxwriter.readthedocs.io/
from PIL import Image
import xlsxwriter

img=Image.open('kirby.png')

pixel_image = img.quantize(6)
rgb_im = pixel_image.convert('RGB')
small_img=rgb_im.resize((64,64),Image.BILINEAR)

final_image=small_img.resize((500,500),Image.NEAREST)
final_image.save('kirby_pixel.png')

#Create our .xls file with one sheet
workbook = xlsxwriter.Workbook('kirby_pixel.xlsx')
worksheet = workbook.add_worksheet()

#Changing the size of our first 1000 columns (here I'm using 10 px)
worksheet.set_column_pixels(0, 999, 10)

#Getting the pixel RGB values (colors) of our image
pixel_values = list(small_img.getdata())

#Iterating throug the size of our image (64 x 64 px) to draw it
for x in range(64):
	#Changing the size of our rows (also to 10 px)
	worksheet.set_row_pixels(x, 10)
	for i in range(64):
		#Using a mask to get the HEX value of our RGB since thats the one that Excel uses
		color = '#%02x%02x%02x' % pixel_values[64*x+i]
		#Filling the background of our cell
		cell_format = workbook.add_format({'bold':True, 'align':'center', 'bg_color':color})
		worksheet.write(x, i, '', cell_format)
workbook.close()
Getting a file like this one:
Creating a function that do all together
Since in the last result, our initial image had the same proportions of a square, so we worked with that in mind. However, do you wonder what would happen if we had an original file with different proportions or if we changed the dimensions? Our results would not look as good as we want to.
In order to avoid that, now we are going to create a function that would do some tweaks with the original image size to always get a nice result, using the number of colors and number of pixels that we want in our result, and the size of our canvas and the path of our image as inputs:
from PIL import Image
import xlsxwriter

def image_to_pixel_art(image_path, number_of_colors, number_of_pixels, canvas_max_size):

	#Reducing the canvas max size due to some bugs with the xlswriter functions and to keep our image in frame
	canvas_max_size = canvas_max_size - 100

	#Check to a maximun number of pixels to avoid crashing excel (you can increase this number)
	if number_of_pixels > 256:
		print('The max number of pixels is 256')
		return

	#Find the maximun cell size to be used
	cell_size = (round(canvas_max_size / number_of_pixels))

	#Since the minimun size for a Excel cell is 1px, we round our size to 1 and get the proportion of the rounding
	if cell_size == 0:
		cell_size = 1
	elif cell_size < 1:
		cell_size = 1
	print('Cell size:',cell_size)

	#We get the size of the input image
	img=Image.open(image_path)
	width, height  = img.size

	#Now we resize the width and heigth with our number of pixels to keep the proportion
	if height > width:
		height_f = number_of_pixels
		img_proportion = number_of_pixels/height
		width_f = int(round(width * img_proportion))
		print('h,w,prop:',height_f, width_f,img_proportion)
	elif height < width:
		width_f = number_of_pixels
		img_proportion = number_of_pixels/width
		height_f = int(round(height * img_proportion))
		print('h,w,prop:',height_f, width_f,img_proportion)
	elif height == width:
		height_f = number_of_pixels
		width_f = number_of_pixels
		print('h,w,prop:',height_f, width_f,img_proportion)

	#Image transformation
	pixel_image = img.quantize(number_of_colors)
	rgb_im = pixel_image.convert('RGB')
	small_img=rgb_im.resize((width_f,height_f),Image.BILINEAR)

	final_image=small_img.resize((width,height),Image.NEAREST)
	final_image.save(image_path.split('.')[0] + '_pixel_' + str(number_of_pixels) + '.' + image_path.split('.')[1])

	#Create our .xls file with two sheets
	workbook = xlsxwriter.Workbook(image_path.split('.')[0] + '_pixel_'+ str(number_of_pixels) +'.xlsx')
	worksheet = workbook.add_worksheet('Image')
	worksheet_2 = workbook.add_worksheet('Color Map')

	#Changing the size of our columns
	worksheet.set_column_pixels(0, width_f, cell_size)

	#Getting the pixel RGB values (colors) of our image
	pixel_values = list(small_img.getdata())

	#Iterating through the size of our image to draw it
	for x in range(height_f):
		#Changing the size of our rows
		worksheet.set_row_pixels(x, cell_size)
		for i in range(width_f):
			#Using a mask to get the HEX value of our RGB since thats the one that Excel uses
			color = '#%02x%02x%02x' % pixel_values[width_f*x+i]
			#Filling the background of our cell
			cell_format = workbook.add_format({'bold':True, 'align':'center', 'bg_color':color})
			#Draw our image in the first sheet
			worksheet.write(x, i, '', cell_format)
			#Save the HEX values in the second sheet
			worksheet_2.write(x, i, str(color))
	workbook.close()


#Testing our function

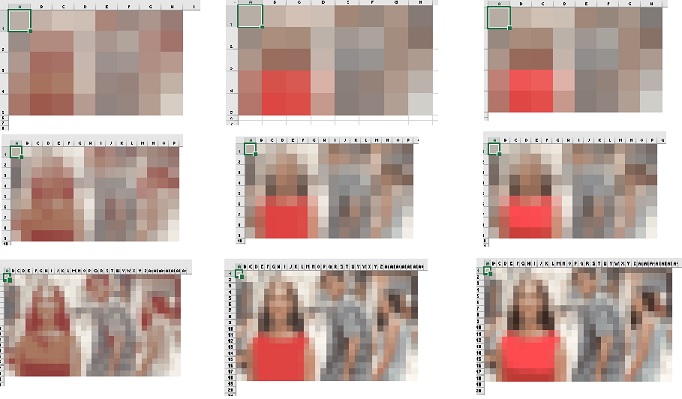
image_to_pixel_art('damngina.jpg',6,8,695)
image_to_pixel_art('damngina.jpg',12,8,695)
image_to_pixel_art('damngina.jpg',16,8,695)
image_to_pixel_art('damngina.jpg',6,16,695)
image_to_pixel_art('damngina.jpg',12,16,695)
image_to_pixel_art('damngina.jpg',16,16,695)
image_to_pixel_art('damngina.jpg',6,32,695)
image_to_pixel_art('damngina.jpg',12,32,695)
image_to_pixel_art('damngina.jpg',16,32,695)
Getting all our transformations:
The full code used in the last function can be found in the blog’s github.
Conclusion
Hopefully this simple example can give you some ideas on how to work with an image, doing different transformations and saving it to other formats. Furthermore, you can use this functions to achieve other results such as blurry an image (or maybe only some pixels of it) or even create a simple cryptography method to share information.
